
I know! I just can’t stop making bras.

Yet another Shelley bra from Pin-Up Girls! Of course. If it ain’t broke, don’t fix it. Plus there are so many ways to change up the look of the same basic bra pattern. The one fitting change I made to this one was to raise the neckline a bit. I brought it up 1/2″ at the bridge, grading out to 1/4″ at the strap. I also had to adjust the bridge, power bar, & frame at the underarm to accommodate this change, but the result is that I have better upper breast coverage. To wit:

I think the fit is pretty much perfect now! I’m toying with the idea of maybe raising the underarm area just a little, but it doesn’t seem necessary.
The above photo is lightened a bit so you can see the construction details. This whole thing was all my idea, & I really lucked out that it worked as well as it did. It occurred to me like 75% of the way through the construction that there was an easier way to achieve a similar effect, but that it was too late to implement it.
So. My vision was an all black bra with a ribbon lacing detail along the upper cup in lieu of lace. Instead, I would drape the lace across the finished bra front to cover the entire frame, with the scalloped edge climbing up the underbust area, but staying below the apex. I wanted to create a gravity-defying kind of illusion with the lace placement. I took a chance on laying my lace over the pattern piece for the half-frame (the frame is cut on the fold), covering the entire frame with the scallops across the empty cup area. I added a 1/4″ seam allowance at the bridge & cut two & sewed them together. As Beverly Johnson taught us in one of her bra classes on Etsy, a straight line placed across a sphere (such as a breast) will appear to curve, while a curved line will appear straight. As flat fabric, my lace piece appeared to dip down to a V at the bridge, but when draped across the bra with breasts in it, it creates this interesting optical illusion where it seems straight, but it clearly also angling down from the underarms to cross the breast under the apex. Pretty neat, huh?

The sewing was a challenge. The thing I realized when it was too late is that I could have just cut a lace frame & a separate scalloped piece using the cup pattern pieces. It would have been difficult to match the scallops at the bridge, but eh.
It was too late for that kind of sensible construction though. Instead, I basted my lace to the edges of the frame all around after the entire front of the bra was finished, cups & channeling sewn in, etc, leaving the rest of the lace loose. I applied the band & underarm elastics & then I pulled the lace taut against the frame to mimic the stability of the Duoplex. My lace was a very slippery, wiggly stretch lace & it wanted to shift all around. I really wanted to avoid wrinkles from pulling the lace too taut or leaving it too loose in places that were already stable. I hand-basted the lace in place right at the wire line.
Then I took a deep breath & topstitched my channeling. Obviously this was very difficult because I couldn’t really see the seamline through the lace. I just had to feel for the channeling & pull the frame & cup without shifting the lace too much. Once I had my first line of topstitching in place, the second line was easier because I could just follow 1/4″ away from the first pass. If you can believe, I actually managed to get it right on my first try!
Then, pulling both the cup & the lace as taut as I could without creating distortion, to mimic the effect of the cup being filled with a breast, I zigzagged the scalloped edge in place. If you really look, you can see that it’s not 100% symmetrical across both cups, but you know what? There are no wrinkles, no pulls. I am THRILLED with how it turned out. This is the kind of effect that is used on foam cups all the time, because the shape of the foam mimics the shape of a breast, so the fabric manipulation is a lot easier. But there’s no foam in this. It’s just Duoplex. It could have gone so wrong.
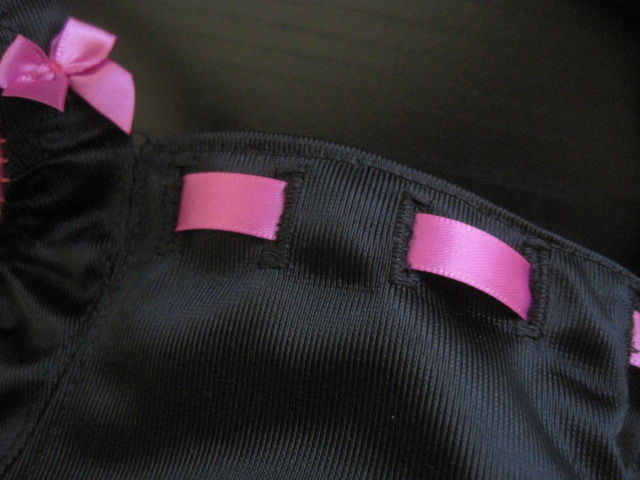
& then there’s the lacing. I’ve seen this effect a lot in RTW & a few times on blogs, but I couldn’t find any explanation of how to do it. Just stitching lengths of ribbon in place made me worry about the ribbon fraying over time. I really wanted to actually lace the ribbon through the cups, but I didn’t want to leave unfinished holes in my Duoplex. So I made buttonholes, seven in each cup. & then I added bows to the bridge & each strap.
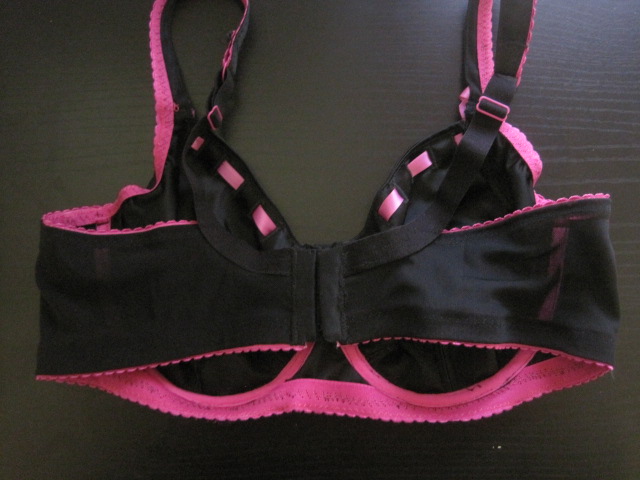
After all that, I left the back pretty understated. You can see I used pink elastics, channeling, sliders, & rings. I’m still not super-great at sewing on the hook & eye (it’s the hook part that gets me), but I’m getting better.

Yeah, definitely not ready for contrast stitching there!
& of course, I also made matching undies.

Black jersey Butterick 6031 finished with pink stretch lace. Doesn’t look like much from the front. The real interest is in the back.

I cut a little triangle out of the center back & covered it with a little lace scrap I made with the scallops facing in opposite directions.

It’s just a tiny bit sheer. A very subtle effect, but it pulls in the lace on the bra.
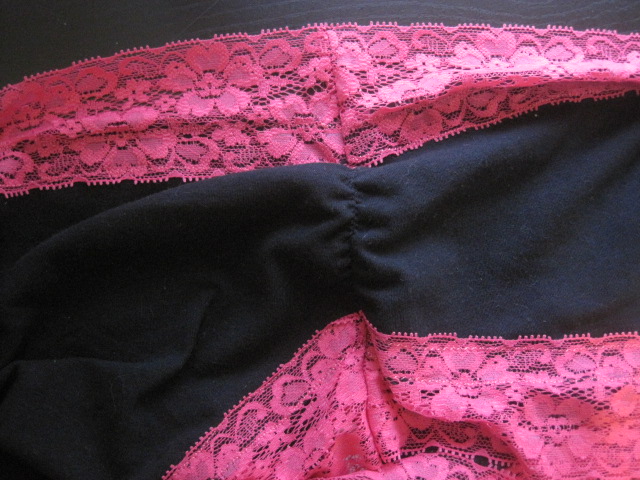
& I ruched the sides, which is super-easy to do. Just zigzag some elastic to the wrong side of whatever you want to ruche, & stretch the elastic as you sew it. When you’re done, it will gather the fabric. You can do this with anything: lingerie, t-shirts, at the hems of leggings, whatever.

So that’s that! I’m pretty pleased with this set. I’m wearing it right now & it’s pretty comfy. I feel like the color combo is maybe a little bit Frederick’s of Hollywood (not a good thing, in my eyes), but…pink is my favorite color & black is my default neutral, so I guess it is what it is.
I’m already brewing up ideas for my next set, but I also suddenly remembered that it’s May & the outdoor pools open at the end of the month, so I need to make a swimsuit stat.

Awesome lingerie set! I love pink and black too! I have a suggestion that may help with the hook and eye. The hooks are always the problem because the sewing machine does not like them! My sewing machine allows me to move the needle position, so I set the foot down so it just touches the hooks, and move the needle over so it stitches down the edge. I use a straight stitch for this. To make it even easier, I use double sided basting tape- so it sticks the hook and eye to the fabric – no pins. If you don’t have the needle position option, try putting something under the presser foot so it is not on an angle to start stitching. There are different names for this little gadget- Hump Jumper is one of them, I used the plastic sewing machine needle case. It allows the foot to start out in a flat position, and once started it is fairly easy to keep, the foot on top of the hooks while the needle does the stitching – if the foot falls off the hooks, you won’t get a straight line, but with practice it gets easier. I hope this helps with that pesky problem! I loved your Purple Rain set too! Great combination of fabrics!
Thanks, Linda! I’ve made a couple more sets since these (haven’t blogged them yet, but will get to it soon) & I’m gradually getting better. I think it’s just a question of practice & experimenting with machine settings & needle position. I’ve started using a pretty wide, tight zigzag & that is working well. My most recent set even has contrast stitching on the hook & eye (because the hook & eye is a different color from the back band) & it turned out pretty well!